In writing this, I assume the reader has some working knowledge of using the Linux command-line. I strongly recommend keeping your work inside a git repository: being able to revert back to a known-working version was a lifesaver on multiple occasions.
What is Singularity?
In a nutshell, Singularity is a container platform built on the principle of mobility of compute. It is designed to be used on HPC clusters and, unlike Docker, it does not require root access to mount an image. In addition, it can use Docker images out-of-the-box and it can pull them from the Docker Hub. For more information, see the Singularity website.
Containers are a solution to the ever-present dependency problem: how do you make sure that the user has all of the software needed to run the program you are shipping? In general terms, containers work by bundling a specific operating system, alongside other necessary software, and running the target program using them.
While Docker has become the most-used containerisation platform, Singularity is interesting for a couple of reasons:
- It does not require root access for the most common workflows. This means that users can simply add their image to a high-performance computing cluster and do the necessary work without needing an administrator password.
- Singularity uses the Docker image format, which means that it works with the myriad of available bundles on the Docker Hub.
Therefore, a computer running Singularity on top of a minimal Linux build can host virtually any software, regardless of its dependencies or even the operating system the software was built for, as long as you can make or obtain a working image.
What is the Yocto Project?
The Yocto Project is an open-source, mostly MIT-licensed collaboration that makes it easier to create and build Linux-based embedded systems. It offers a mature, fully automated Linux build system, supporting all major embedded architectures, alongside recipes for various commonly-used software.
Unifying the world of embedded Linux is a daunting task. The Yocto Project has done a stellar job of it, but it is not user-friendly. Things can and oftentimes do go wrong. Errors in a file can create errors of an apparently unrelated origin. Thankfully, the Yocto user manual provides immense detail concerning common tasks, and the Yocto Project mailing lists are publicly available and can be of great help.
Getting started with Yocto
If you are new to the Yocto Project, I strongly recommend reading the entirety of the Yocto Project Quickstart and following its steps until you can successfully emulate a basic image using QEMU. By doing this, you will become familiar with some of the basic tasks, and if something goes wrong it will be significantly easier to find help online. Once this have succeeded, you will have a known working state onto which you can apply the steps within this guide.
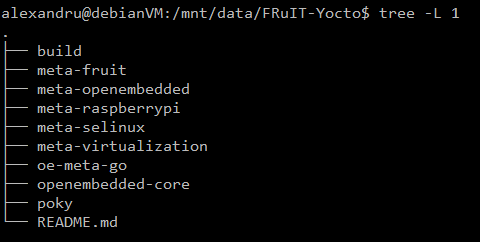
Note: I prefer keeping the build directory and my layers outside the poky directory, in order to make changes easier to track using git submodules. This is my directory structure:
I initialise the build environment by running:
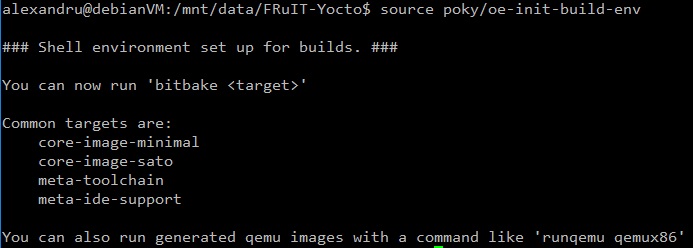
Contrast with the approach in the quickstart guide, where the build directory resides within poky and layers are cloned within the latter. I recommend following my approach, for consistency with the rest of this guide.
Creating your own image
In this section I will detail the process of writing an image using software from within the Yocto project. The end product will be a fully-featured Linux build containing the Singularity containerisation engine.
Obtaining the necessary layers
Since our target platform is the Raspberry Pi, you must have the Raspberry Pi BSP in our layer directory. Obtain it by cloning the repository:

The link to the remote used in the command can be found within the webpage linked above. For reference, here is the command used:
git clone git://git.yoctoproject.org/meta-raspberrypi</code]>
Once you have cloned a layer, you need to tell the build system to use it. You can do that using:
bitbake-layers add-layer ../meta-raspberrypi/
Here it is in action:
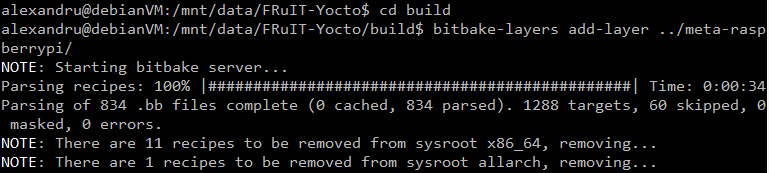
WARNING: Running the bitbake-layers tool outside of the build directory makes it fail and print out a massive stack trace. Make sure you are within the build directory and that you reference the layers from this directory.
Click here for further information about bitbake-layers.
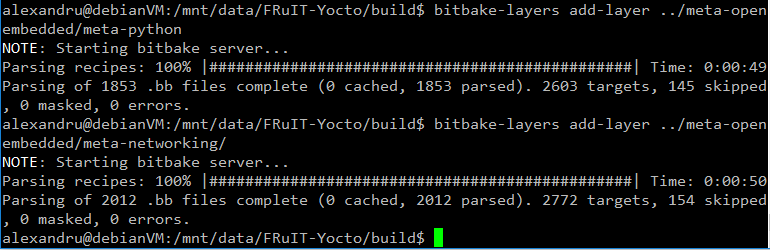
Inspecting the README.md file of meta-raspberrypi reveals that some extra layers are required: the meta-oe, meta-multimedia, meta-python and meta-networking from within meta-openembedded. Clone the meta-openembedded layer using the remote in README.md and add the necessary layers using bitbake-layers add-layer. The order is important: Adding meta-networking before meta-python causes an error:
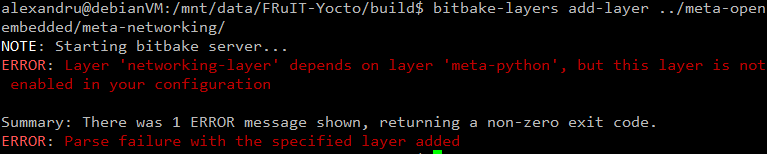
Thankfully, bitbake-layers told us exactly what is wrong. The error is fixed by adding meta-python before you add meta-networking:
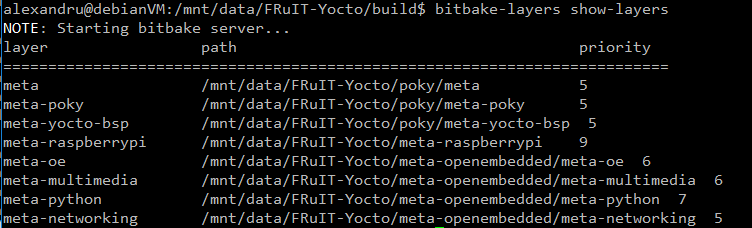
We can see what layers we are currently using by running bitbake-layers show-layers . At this stage, you should have the same layers as shown below. Make sure you have all these layers before proceeding.
meta-virtualisation
The recipe for Singularity resides within meta-virtualisation. Clone this layer and add it to the build system as shown above. The README.md file reveals that this layer has further dependencies: openembedded-core, meta-filesystems, oe-meta-go and meta-selinux. The README.md file also provides links to the remote repositories of these dependencies, therefore adding them to your build should be straightforward.
NOTE: The dependency on openembedded-core is fulfilled by the layers automatically added from within poky. You should skip cloning and adding this layer. Poky can replace openembedded-core because it was developed off of OpenEmbedded.
Once you have added the layers required by meta-virtualisation, you should be left with this: 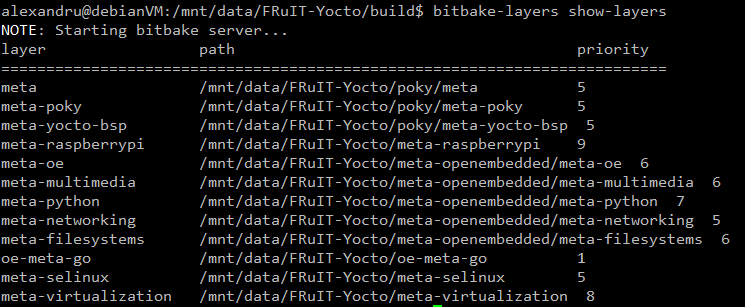
Once you are at this stage, you are ready to create your own image. Important takeaways:
- Make sure you fully read the README files of any layer you plan on using, and that you obtain the layers it depends upon.
- Do not forget to add any layer you want to use by using bitbake-layers add-layer.
Writing the custom image recipe
In order to keep everything organised, and to make it easy to share the work, I like to keep my images inside a layer, even though you can obtain the same result by modifying local.conf. The easiest way to create a layer is by using the yocto-layer script:
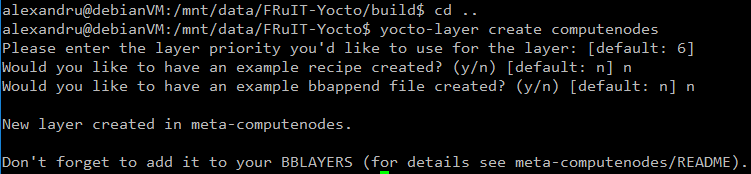
yocto-layer create generates the minimally required files to create a layer, leaving it to the user to populate it with recipes.
Make sure you make the build system aware of the layer by using bitbake-layers add . Remember that you must be inside the build directory to successfully run the bitbake-layers script. Additionally, give a sensible name to your layer! The OpenEmbedded build system does not support file or directory names that contain spaces.
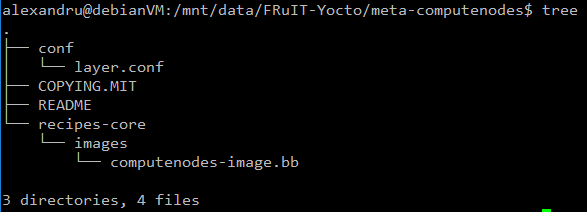
It is conventional to store image recipes under a recipes-core/images directory, inside the layer folder. Therefore, we will follow this convention. The image itself should be a .bb file. I have named mine ‘computenodes-image.bb’ . Here is what the directory structure should look like:
computenodes-image.bb must contain the following lines:
SUMMARY = "Basic image, containing Singularity"
LICENSE = "MIT"
# Base the image upon a mostly complete Linux build
include recipes-extended/images/core-image-full-cmdline.bb

# Install the Singularity containerization platform
# Also install kernel modules, as detailed in the BSP that is being used
IMAGE_INSTALL_append = " \
    singularity \
    kernel-modules \
    "

# Allocate ~1 extra GB to pull containers
IMAGE_ROOTFS_EXTRA_SPACE = "1000000"
This recipe is based upon rpi-hwup-image from meta-raspberrypi. Files preceded by a ‘#’ are comments. The important changes are the fact that it includes core-image-full-cmdline, as opposed to core-image-minimal. This change provides a more complete Linux environment, as opposed to a system which is not capable of doing much more than booting. We are additionally installing Singularity and allocating more SD card space for the containers.
The SUMMARY variable is meant to succinctly describe the product of the recipe. The LICENSE variable specifies the license under which the source code / recipe is licensed. It must be included inside any recipe. Here is some more general information about how OpenEmbedded handles licensing.
The include keyword includes all of the text of the mentioned recipe inside the file. BitBake has multiple ways of sharing functionality between files. Additionally, IMAGE_INSTALL must be used with care. While IMAGE_ROOTFS_EXTRA_SPACE is more or less self-explanatory, the Yocto documentation has a section on it.
Building the image
To inform the build system that you want to target a Raspberry Pi, you must add the following line to build/conf/local.conf:
MACHINE = "raspberrypi3"
Now, you are finally ready to build. Run bitbake computenodes-image and, after waiting for the build to be complete, you can find the end product under build/tmp/deploy/images/raspberrypi3 . In my case, the image is called computenodes-image-raspberrypi3.rpi-sdimg . You can then flash the image using Etcher. If Etcher does not recognise the file as a valid OS image, change .rpi-sdimg to .img inside the filename. Alternatively, you can achieve the same result with a symbolic link to computenodes-image-raspberrypi3.rpi-sdimg if the link’s filename ends with .img .
Testing the image
Obtain access to the terminal by plugging in a monitor and keyboard or, if you know the IP address of the Pi, you can SSH into it. Once you’re there, you can test Singularity:
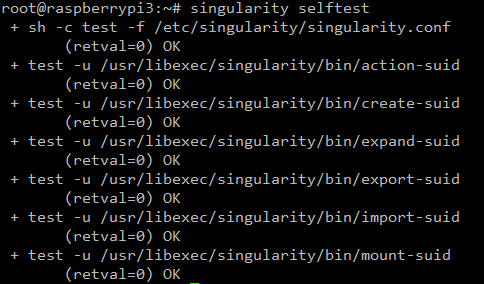
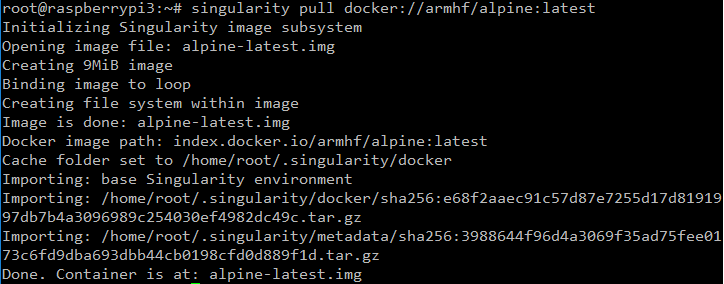
If the selftest succeeds, try pulling a container from the Docker hub:
It works! Let us open a shell inside the container.
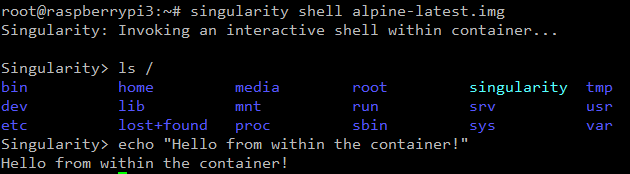
Another example:
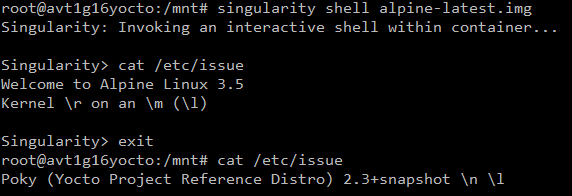
It is clear that the environment inside the container is different from the one outside.
Conclusion
We have looked at creating a basic image using the Yocto project. The process involves cloning the necessary layers and their dependencies, creating a new layer, writing the image recipe and, finally, building it. Our test image successfully booted, and the Singularity containerisation engine works without a flaw.
]]>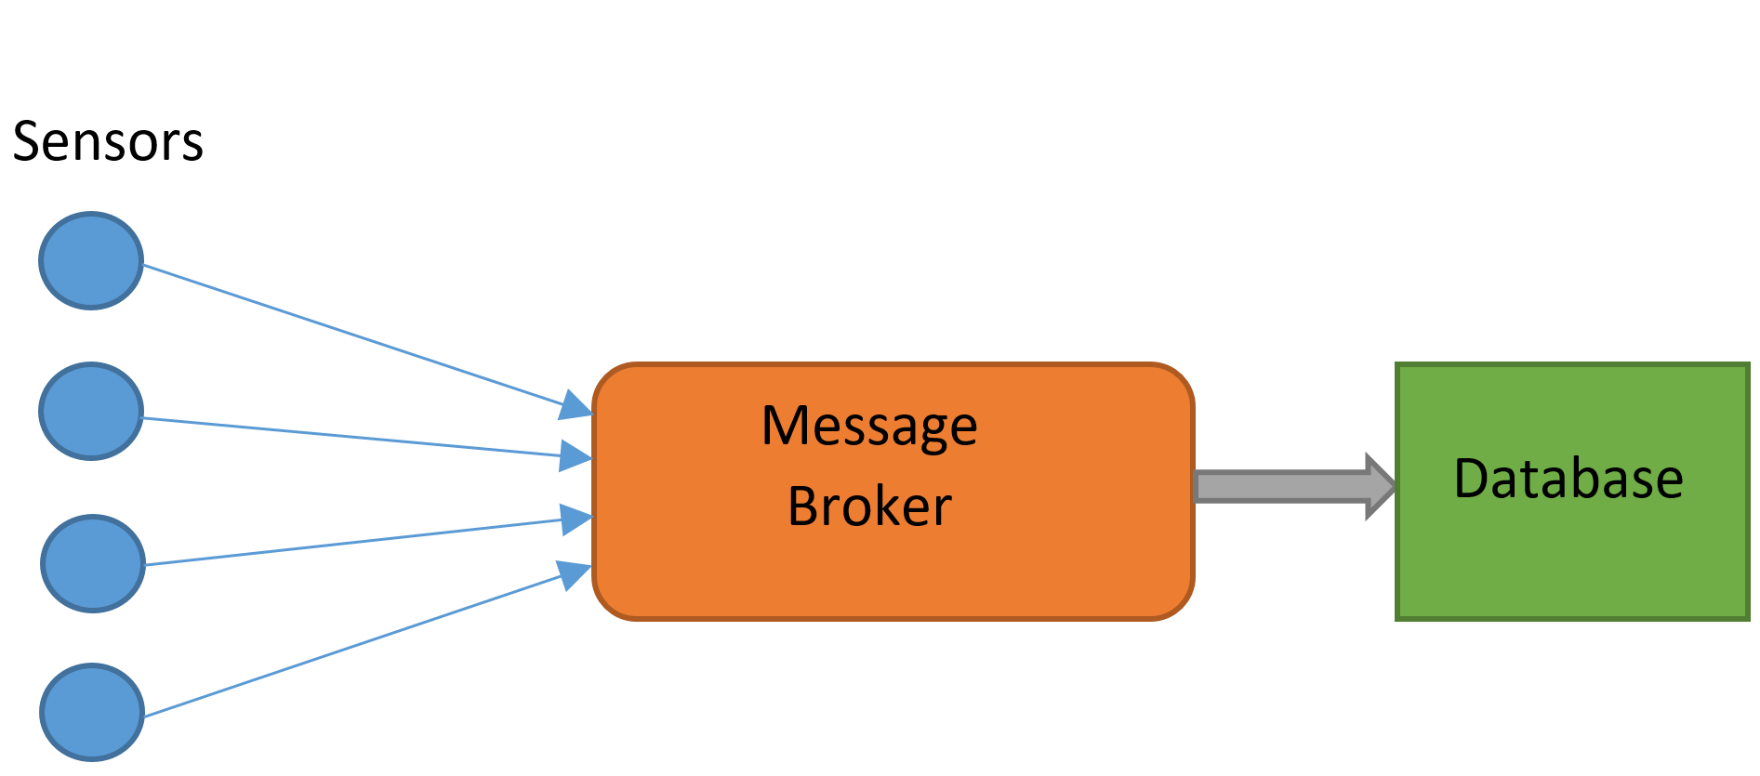
More powerful message brokers are capable of sorting messages based on their properties. Different messages may need to be delivered to entirely different devices on a network. RabbitMQ allows for the sorting of different types of messages based on their properties, ensuring they go straight to the correct delivery point.

There are many ways in which RabbitMQ can be instructed to distribute messages. For example, in a “fanout” exchange every message received can be sent to every known consumer. It is capable of sorting messages based on their content.
In our deployment, RabbitMQ was to be used to take messages from The Things Network gatweays and store them. MQTT (Message Queue Telemetry Transport) is a protocol designed for machine-to-machine (Internet of Things) applications, and was the protocol used with RabbitMQ. It may be necessary to enable the MQTT plugin:
RABBITMQ-PLUGINS ENABLE RABBITMQ_MQTT
RabbitMQ can be interacted with using a multitude of different programming languages; we used Python. Messages from the gateways were correctly received by RabbitMQ, however it was not possible to process them further. The complexity of RabbitMQ made it difficult to perform any processes more complex than sending and receiving messages from the localhost. After many hours of tweaking, it was still not possible to obtain data via RabbitMQ, and an alternative solution was necessary.
Mosquitto is an alternative message broker, developed exclusively for use with MQTT. It is a much simpler, lightweight alternative to RabbitMQ. Due to its reduced feature set, performing complex routing arrangements is less practical. RabbitMQ also features a slick, built in user interface, viewable through a web browser, a luxury not available on the Mosquitto broker. This makes it less easy understand the status of the message broker and the data. This simplicity was an advantage however; shortly after installing and switching to Mosquitto, data was correctly received. Furthermore, it is often possible to process and sort the messages in Python (or another language), negating an advantage of RabbitMQ
When choosing a message broker, it is important to evaluate whether the extra features of RabbitMQ are really necessary, and justify the extra complexity. In our use case the goal was simply to transfer data from The Things Network to be stored in MongoDB. It was far quicker and more efficient to use MQTT than RabbitMQ, and there was no loss in functionality in doing so.
Pika (RabbitMQ-Python Interface)/
Paho MQTT (Python MQTT client)
import paho.mqtt.client as mqtt  # library for communicating with mqtt
from pymongo import MongoClient  # mongoDB library
import json  # for (de)serialising javascript objects


def TTN_add():
    try:
        print("TTN_Add running")
        mqclient = mqtt.Client()
        mqclient.on_connect = on_connect  # on connection runs "on_connect function"
        mqclient.on_message = on_message  # on message...
        mqclient.connect("localhost", 1883, 60)  # 60 indicates keep-alive time
        mqclient.loop_forever()  # keeps it going forever
    except KeyboardInterrupt:
        mqclient.loop_stop()
        print("stopped")


def mongo_insert(Gateway_ID, payload):  # function to add stuff to the database
    collection = db.test_collection  # this creates the collection
    print ("Gateway_ID " + Gateway_ID)
    payload = json.loads(payload)  # payload to json version
    collection.insert_one(payload)
    return


def on_connect(mqclient, userdata, flags, rc):
    print("Connected with result code "+str(rc))
    mqclient.subscribe("gateway/#")  # only gateway topics


def on_message(mqclient, userdata, msg):
    print("on_message")
    print (msg.topic, msg.payload)
    # print (type(msg.payload))
    mongo_insert(msg.topic, msg.payload)


moclient = MongoClient('localhost', 27017)
db = moclient.ttn_database
TTN_add() #starts event handlers
]]>
The K30 is a low-cost, low-maintenance CO2 sensor capable of interfacing with a Raspberry Pi. It is designed to accurately measure ambient CO2 levels over long periods of time. The K30 detects CO2 using an infrared source, and an infrared detector. Since different molecules absorb different wavelengths of infrared light, the amount of absorption at certain wavelengths indicates the levels of those molecules. This leads to measurement issues when other molecules absorb light at similar wavelengths. In situations of low concentrations, SO2 and NO2 can cause cross sensitivity with CO2.
Used in conjunction with a Raspberry Pi, the K30 is perfect for remote monitoring of CO2 levels. The Raspberry Pi has many unique qualities that make it perfect for interfacing with the K30 and other sensors. Its respectable compute power, versatile General Purpose Input Output (GPIO) pins, and full network capabilities allow it work with almost any sensor. Combined with its low cost and compact size, it is an excellent choice for most applications. The Raspberry Pi 3 has Wi-Fi and Bluetooth built in which makes sending the data to other devices relatively easy. In our deployment of the K30, remote data communication will achieved using LoRaWAN, a long range, low power network. This will be used to send data to a gateway connected to the internet.
Some setup is required to best utilise the Raspberry Pi to communicate with the K30 Sensor. The K30 communicates over serial, which required the Raspberry Pi to have UART (Universal Asynchronous Receiver Transmitter) enabled. This can be done by editing the boot configuration:
$ sudo nano /boot/config.txt
And appending the file with:
enable_uart=1
By default, the console uses the serial output to output data, which can be used as a way to control the computer headlessly. This should be disabled to allow the serial output to be used by the K30 for data transmission. This can be done by deleting the console serial port allocation in the boot file:
$ sudo nano /boot/config.txt
The allocation will look something like:
“console=ttyAMA0,115200”
Alternatively, this can be disabled through the interface options in the raspberry configuration menu:
sudo raspi-config
Once the Pi is prepared to receive serial data, the K30 must be connected. This is a relatively simple case of connecting the K30 to 5v (a separate power supply was used), connecting the Pi and K30 to ground, and then cross-connecting the serial connections. A simple LED circuit was also established from the Pi’s GPIOs.
To test the K30 sensor, a prototype as developed, using a Raspberry Pi, the sensor, and some LEDs. CO2 readings were read from the K30 using the serial library in Python, which then controlled LEDS via the GPIOs. To visually demonstrate the functionality of the K30, a red LED was turned on when values over 1000 ppm of CO2 were detected. Values within the room were typically around 600 ppm, which could easily be raised over the 1000 ppm threshold by exhaling on the sensor. The ambient readings are in line with the expected CO2 levels for an office, and the sensor clearly respond to an increase in CO2 levels.
The full Python code used is below. Note that the serial port is TTYSO which is standard for the Raspberry Pi model 3. In earlier versions of the Raspberry Pi this may be different.
More information on the K30: https://www.co2meter.com/products/k-30-co2-sensor-module
Full Python code:
#rpi serial connections
#Python app to run a K-30 Sensor
import serial
import time
import RPi.GPIO as GPIO
GPIO.setmode(GPIO.BOARD)
GPIO.setup(12, GPIO.OUT)
GPIO.setup(16, GPIO.OUT)
ser = serial.Serial("/dev/ttyS0", baudrate=9600, timeout = 1) #serial port may vary from pi to pi
print ("AN-137: Raspberry Pi3 to K-30 Via UART\n")
ser.flushInput()
time.sleep(1)
cutoff_ppm = 1000 #readings above this will cause the led to turn red

for i in range(1,101):
    ser.flushInput()
    ser.write("\xFE\x44\x00\x08\x02\x9F\x25")
    time.sleep(.5)
    resp = ser.read(7)
    #print (type(resp)) #used for testing and debugging
    #print (len(resp))
    #print (resp)
    #print ("this is resp" + resp)
    high = ord(resp[3])
    low = ord(resp[4])
    print(high)
    print(low)
    co2 = (high*256) + low
    print ("i = ",i, " CO2 = " +str(co2))
    GPIO.output(12, GPIO.LOW)
    GPIO.output(16, GPIO.LOW)

    if co2 > cutoff_ppm:
        GPIO.output(12, GPIO.HIGH)
    else:
        GPIO.output(16, GPIO.HIGH)
    time.sleep(.1)

]]>